Sunday, 13 January 2019

DIY Painted Faux Tile


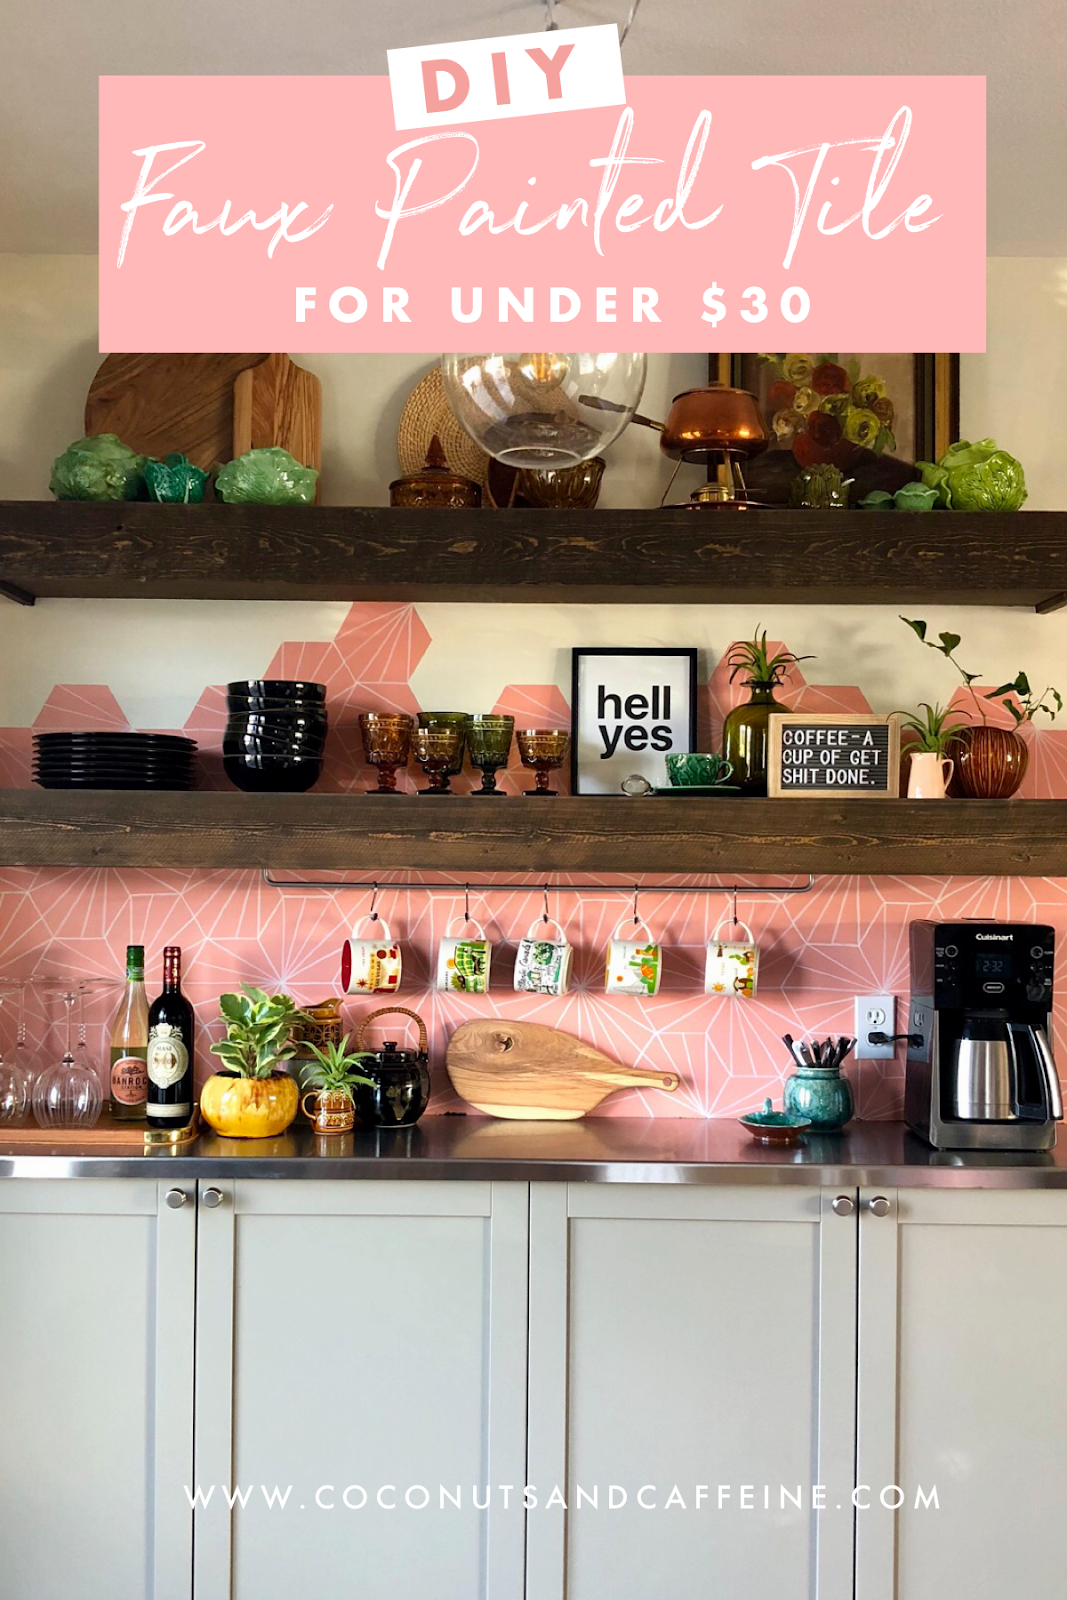
It all really started when I found this teensy blush pink coffee creamer and I painted my front door PINK!!  Then the idea snowballed to bring the color in to another part of my house, and my coffee station was on my mind for change and it was a perfect fit!!  I used the next color darker down on the paint chip from my front door, called Priceless Coral, from Behr.  It needed to pop just a bit more for me and it worked! 


I wanted to keep this project as budget friendly as possible and I am proud to say the total was under $30.00 for the can of paint. That's it! Here is a look at the before picture.  I LOVE my coffee station, but it was time to zhuzz it a bit and make it brighter!


I also needed a template for the hexagons so I had an idea to use the marker from Shift Shop, a fitness program I have done a few times in the past.  This was PERFECT!!  They were also flexible, making it perfect to trace the pattern on around the shelves!  I tried a few colors out, then I actually tested my idea out on a piece of foam board to make sure my brain and the final product matched up! 


I did buy a few different color testers out because I wanted to play, but ended up going with my first choice.  Isn't that always the way? 

After taping things off, I started in with painting one coat of white and coral then I needed to get pattern placement done. I just estimated where I figured the coral would be ending and then started.  I did a second coat of white, then mocked up the pattern on the coral, then the white.  I taped it off and the painted on the rest of coral.  Then I gave the coral a second coat. 


The next morning, I started in the center bottom and traced on the hexagon grid.  I used a white colored pencil, so the lines were just visible enough to see.  Of course, I was using white paint for the lines, so this was perfect.  I just used some of the white wall paint, and made sure to add drops of water to it to keep it flowing as needed. Latex paint thickens as it is exposed to air so this is important.  


After the grid was made, I then traced on the other lines inside the hexagons by using a ruler and the white colored pencil again.  

Then it was time to get to work!  It took most of the afternoon to paint all the lines because the angles were awkward and it was hard on the arms. But with copious amount of coffee and sheer determination, it got finished! I just used a small round brush I got at Michaels.  It was a LOT of linework, but to me it is therapeutic and I loved it actually. :-)


I shopped my house for all the decor because that kinda thing makes my budgeting soul VERY happy!  

SIDE NOTE:  I do have to pick up a teensy piece of moulding for the back of the station (there was caulking residue I just didn't remove properly) but that will only be a few dollars.  Overall, I am proud of how it turned out and LOVE the insane new vibe this side of my kitchen has now.  And most of all, I proved to myself that I could do this on such a small budget!  WOOP WOOP!! 


TIME LAPSE OF ENTIRE JOB:


SHARE:

Thursday, 8 February 2018

Cash Budget for January..month one under my belt!


Month 1 of cash budgeting! I did not die! These are the 6 areas I generally overspend on so these are my cash envelope categories. Now. Let’s chat & do a recap of categories, shall we? 
1. Groceries
This one is at the top and is the biggest most impactful change to me. When I look at my total which I have circled in red for all six categories… That is the amount that I typically have spent on average per month, on groceries. So I budgeted $500 for January and I went over by $11.68. I am impressed BEYOND! 

2. Fuel
So because this was my first month travelling for work I really had no idea how much it was going to cost me for fuel. Clearly it’s been a while since I have been on the road and when I was, my fuel was paid for by my previous companies so I had no idea and I budgeted $150 to start which was super low. This was an eye-opener as to how much fuel really is.

3. Dining Out
To be honest I do not eat out very much so I budgeted myself $80 and I still had money to spare. There are days that I stayed late after work and had to buy something for supper so that pretty much takes care of what I spent. 

4. Clothing
I budgeted $100 for this because hello, I work at a clothing store with amazing pre-loved items and I thought $100 would be a great starting point. I also had purchase a bra which was that extra $55.79. Two things… GOOD Bras are not cheap which we all know. I need to keep adding to my wardrobe because my clothing for work has been limited simply because my wardrobe falls between yoga wear and super dressy. But fortunately I have options where I work. 

5. Creative Team & Thrifting
This one is a new category...sort of. I am part of a creative team with lady that I admire and it involved be having to purchase a few things up front, but it will pay for itself AND this will not be a recurring amount. I expect next month will be around the same and then after that it will be reduced greatly. This is a bit of a new career opportunity so to me it’s an amazing investment.

6. Starbucks
OK no let me just preface this by saying just because I am on a budget does not mean that I will be eliminating my Starbucks bevvies. It just means that instead of going a few times a week. I will just be reducing that down. Also, I did purchase egg bites twice, which I left in this category instead of moving to dining out. Next month I want it to be less.


I also want to mention that I was not perfect in this month one. Nor did I expect to be. I actually had to purchase fuel and a few other items on debit because I did not make it to the bank in time and just wanted to literally get the hell home after a long day of work and snowy crazy weather. But for 99.9% of the time, all my purchases were cash and that impresses me.

To be honest, a few years ago I thought that this would never be for me… Ever! But I want things to change and I don’t want debt to be holding me back. I want to be in control of my money instead of it controlling me.

I’m not sure why this is not taught in school because this is a life skill that everybody needs to know starting at a young age instead of when they are like me and in their freaking 40’s. But hey, better late than never. And if I can do this, really, there is hope for all mankind. 

Also in the past month my husband and I have paid down a substantial amount on our credit card, which right now is our goal…to get rid of that. I have also paid off one other debt early with extra cash from taking this job.

This is definitely a work in progress and this is the first time I have ever been excited to look at my bank account and make entries into my YNAB tracker and have all the numbers down on paper. Before it terrified me, so literally I ignored it a lot, which is the WORST thing ever. Ignoring doesn’t fix shit...it makes it worse.

It’s been challenging for sure, but being in debt is way more challenging. So I am choosing my hard. And funny story, even through the challenges (Winners, Marshalls, Michaels & all the shiny things) I still have very smartly made some incredible purchases that were part of my budgeted amounts instead of buying ALL the things. And I learned to give myself a breather and consider if this was something I just wanted in the moment or if it was something that I really needed to have. That made the decision easier. 

This is a bit of a novel, but I wanted to share my first month with you. Maybe it will inspire you to make some changes to your finances if that is what you are aiming for. 

I am still a newbie, but each month, it’s going to get better. That excites me BEYOND words!  ðŸ˜€


Two books that really helped me get a grip on things (and I HIGHLY recommend) were:
1. The Total Money Makeover by Dave Ramsey
2. Love Your Life Not Theirs  by Rachel Cruze 

If you have any questions, totally just ask!!  I am learning lots along the way but am happy to share! 

Stay weird,
Wendy 


SHARE:

Monday, 11 December 2017

Cushion Covers in 10 Minutes


Feeding my Buffalo check addiction has been SO gratifying with these super fast & easy cushion covers. It literally took me 10(ish) min from start to finish, and once you make one, your next one will be faster.  Let's get started!


First things first, you are going to need fabric.  I just eyeballed it and grabbed a yard of this gorgeous teal flannel buffalo check.  If you want to be sure, measure your cushon sizes first. I knew from making the cushion cover for my Front Entry Reno that I was definitely good with one yard for 2 of these covers.

You will also need:
*scissors
*pins
*measuring tape
*iron & ironing board
*your cushions or inserts to cover (I have these GORJ cushions from Urban Barn that I am covering just for the holidays)
*matching thread


HOW TO MAKE COVERS:
Hold your cushions taut from corner to corner and measure across the top (width).  Do the same down the sides (length).  This will give you your base height & width measurements.
My cushions are 22" wide x 12" high.

Height - Add 1" to the height. (Mine: 12" + 1" = 13")
Width - Multiply the width by 2 then add 6 inches (Mine: 22 x 2 = 44, then + 6 = 50")

This is the size of the piece of fabric you will be cutting. Mine was 50" x 13".
NOTE: My cut fabric in pic below is folded in 1/2.


 With fabric right side down facing ironing board, press shorter ends in 1/4", then press them over again 3/4'.  Pin in place.  Repeat on opposite end. Stitch both ends.
With the fabric right sides together, overlap your hems about 4 inches.  I really just eyeballed where the center would be, but if you want to be precise, measure the halfway point.  After you have this overlapped, pin together, and your total width should match your first initial pillow measurement, as you can see below in pic.  Pin the other side as well.

Stitch across uppper and lower raw edges with a 1/2" seam.  Clip your corners, turn cushion cover right side out, and press.


Here is the back flap once pillow is inserted.
 Annddd, again, full view.

This is a really FUN way for me to add a bit of fuzy warmth in my living room on the cheap.  Plus, I will probably keep these up all winter, just because there can never be enough Buffalo Check in my life!


I freaking LOVE how it looks with my vintage ochre velvet cushion covers.
Have you made these? If so, did you find them easy?

Stay weird ;-)
Wendy

PS: I got my inspo from My Childhood Treasures


SHARE:

Tuesday, 28 November 2017

Pallet Coffee Table DIY


After seeing all the pallet projects over the years I decided it was about darn time that I hopped on the bandwagon. The project most appealing to me was a coffee table.  I found ONE pallet, but needed 2 the same for what I had in mind.   I had faith I would find another one.  I checked Home Depot every week till another one showed up.  Seeing these were odd size pallets and I could only fit one in my car at a time, it worked out.  

NOTE:  DO NOT I repeat NOT buy pallets.  These were free and all you need to do is head to any hardware/building supplies store and they will actually serenade you and throw rose petals at your feet for taking some of these off their hands.  NEVER Dine & Dash though.  ALWAYS talk to store first before absconding with the goods.

I started in by sanding...and sanding some more. When I was done sanding...yep...I kept going.  Now if you have ever done pallet projects you will know that if you are going to bring them into your living space and touch them and actually USE the pieces, they will need a TON of prep to get to the "touchable" point.  I wanted to be able to run my hand across it without splinters so I just kept sanding til that happened.  BUY LOTS of sandpaper in varying grits.  Start big, and work your way down to the finer stuff. 


I then decided I was going to give some visible texture to my top pallet.  So, I grabbed my son's torch and gave a light burn to the boards.  After burning, I sanded down.  It really made the grain pop and I loved the effect.  I found some spare pallet boards down the street at our local building supplies store out back (just ask them first if they have any for free) to fill in the gaps of the top pallet.  My hubby & son ripped them down for me, so you will need a table saw for this. The gaps were varying widths and I was happy they decided to do this for me while I continued, oh wait for it....sanding!!!


I did several test swatches for stain color and finally settled on Minwax Classic Grey.  Now on it's own, I was not a fan, BUT....after applying and letting it dry...I sanded it down REALLY well and I ended up with a fantastic aged greyed wood look and it was perfect!! Surprisingly, I only needed this tiny can of stain for the 2 pallets.  I used a rag to apply and kind of rubbed it over, not really wanting to deeply soak the wood.  This gave me a TON of mileage with this teensy can and I finished BOTH pallets with not a drop to spare.  If you are more liberal in your appplication, you may need to go up in the can size.  I was hell bent on getting the job done with the small can.  


HOW FREAKING AWESOME IS THIS?? It is coming together and now you can see the vision, right? :-)


After the stain dried overnight, I sanded that sucker like a mofo til it was really worn looking and a ton of the grain was popping through.  It looked amazing and now the fun begins...applying the Poly and making all that killer grain & color come to life.  The finish coat of any project is really the frosting of wood working! I used Minwax Polycrylic in Satin finish.
I applied the first coat, which really as always, soaks in and sucks up a lot.  I let it dry over night, gave a light sanding with fine grit sandpaper, and then wiped down with a damp cloth and went in with coat number two.  The pallets really were looking beautiful at this point and I was happy to be getting close to finish.


I decided to do one last coat on only the top surface of the table.  So I gave the final light sand, wiped down again and applied the last coat of Poly.  The sheen was most excellent and the look I was going for. 

NOTE:  I used 1/2 of this can of Poly to complete the table.  YAY...leftovers for more projects! 


I used 4 screws on each side to join the 2 pallets together.  I basically just lined up the pallets (NO, they are NOT a perfect match, but the rustic imperfection is what makes this piece the best) and then screwed in from the bottom pallet up through to the top.  BAM...ready for the wheels.  


Now comes the jewelry.  LE SIGH!!!  I chose industrial style wheels from Princess Auto but are just like THESE in case you don't have a local Princess Auto near you. These wheels are metal but there are also plastic options if that is not your jam. I used bolts which were about 3/4" and predrilled the holes first to prevent the boards from splitting.  I did another console piece last year with these wheels and they are BOMBASS! I screwed the 2 pallets together first, then the flipped the table over and screwed on the wheels.

DISCLAIMER:  I did NOT measure the pallets, nor did I bring them inside first to see if they fit my living room.  I TOTALLY eyeballed it and knew it would work.  I would recommend measuring though to be sure...haha.  #dontbeaWendy


I could not be more thrilled with how it turned out.  It is the texture my living room needed and it was an update which was super budget friendly.  It requires elbow grease but hey, you can consider that sanding a nice little workout.  #WINNING 
It was well worth the effort!

Have you ever done pallet furniture??  I'd love to see it.  Share a link to your blog post below with me.

Stay weird,
Wendy


SHARE:

Thursday, 9 November 2017

Chalkboard DIY


OHHH, don't you just LOVE those moments when you stumble upon a most gorgeous find for less than a cup of coffee?  I nabbed this baby at ReStore (it was hiding inside a hugeee cupboard there) & knew exactly what I wanted to do with it right at the store:  A Chalkboard!


I took it apart and gave it a good cleaning and was ready to dig in.  

I wanted to use the actual print itself for the chalkboard, so to seal it in and give an awesome base to paint on, I brushed on a coat of KILZ.  

I still had a lot of Cascadia FAT paint left from redoing my SIDE TABLE, and with Christmas coming, this frame was screaming to be painted in this color. I did 2 coats on the frame.

If you have never tried FAT Paint before you should check them out HERE because their colors are AHHHMAZING!!  I am semi obsessed with all things FAT right now.  #sorrynotsorry

This is hands down my favorite chalkboard paint: RUSTOLEUM CHALKBOARD PAINT, which you can get at The Home Depot or Lowes if you have one close.  Clean up is super easy!


This is 2 coats of chalkboard paint. 


After everything dried I used a sanding block and gave the frame a light sanding, focusing on the edges and places where things would naturally wear off over time.  That keeps it authentic looking. I love seeing the original gold peek through. I then sealed the entire frame with MINWAX CLEAR PASTE WAX, then buffed it out after 5 minutes.  I used FAT Patina Wax in the nooks and crannies to give it even more depth and warmth.  LOVE.  IT! 


I prepped the chalkboard, then reassembled and I am ECSTATIC over how it turned out. This might not be it's permanent home, but I had the space here to hang it up and I could not wait! I am SO excited to start decorating for Christmas and include this in the mix!


**CUE ANGELS SINGING**

Do you have a chalkboard anywhere in your house or have you wanted to add one to your decor?  I'd love to see yours too! Drop a link to your blog below in comments and share with me.

Cheers,
Wendy

SHARE:
© WENDY KENNEDY. All rights reserved.
Blogger templates by pipdig